How To Create A Simple Kivy App Using Python?
To create your first kivy app, you need to install a python module called kivy. If you don't know how to install kivy module Click Here. After installing this module simply enter the code shown below.
After typing the code succesfully, create a Class with the name of your app. In this case I will give it a name MyFirstApp() and inherit the App class in it. After creating the Class create a Function named build() with parameter self. After that declare a variable named self.window and assign BoxLayout() class to it. Then simply return the self.window variable. If you are confused with my text or not understanding my steps you can simply see the images shown below.
Now you have written the code to open the window of our app. But, how will this code run? Its simple just write the code shown below after coming out of the class block of code.
After writing this line of code just click on Run button or just press F5 key in your keyboard to run this program.
This is the output screen:
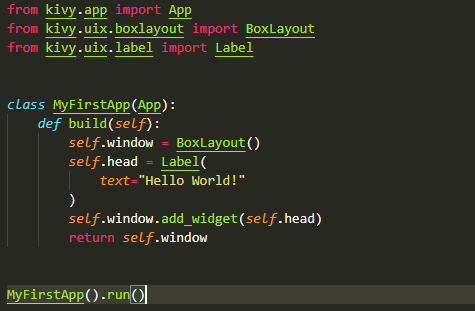
Yes, now our code is running successfully with no errors. Now we are ready to add some widgets into our app. So, for now I'm just using a Label widget. To add a Label widget in our app first, we need to import Label() Class from kivy.uix.label and assign it to a variable named self.head. This Label class contains a text attribute where you can enter the text that you want to display in your app. Enter the text that you want to display inside the text attribute but, only in string. Now our label is ready but, how to add this label into our app? Its pretty easy! Just enter this code in next the line self.window.add_widget(self.head). Now, you can run your app. If you are not getting me just take a look at the image shown below.
This is the output screen:
So now, we have successfully created our first kivy app. That's it in this blog.Thanks for taking a look at this blog page.


Comment Now For Next Blog.
ReplyDeleteVery nice bro 👍🏻
ReplyDelete